
-
PiDashCam – Issues
Well. That didn’t go to plan. I managed to hook the PiDashCam up to the car. It powered on fine, and has recorded, however I forgot to change the settings and it recorded in 10 second blocks. I also mounted it incorrectly, so it sort of sat at an angle. I also went out when it was a bit dark so the images are really not great. The worst part, however, is that the Raspberry Pi Zero didn’t seem to grab the time from the RTC Module. I’ll need to do some digging and figure out exactly where its all went wrong…
Very cropped side by side The camera, although a lower resolution, appears to capture more of the image. Its a shame it appears very hard to see properly, but I’m hoping thats to do with the camera_mode, or possibly the sensor. More tinkering required!
I’ve also been thinking about having a simple way to change the camera_mode when recording. I think I’m going too implement a 3 LED system, using Binary counting, so show which camera_mode I’m using. I’ve have a (very) quick look at Alex Eames code for button presses here and think I can change this so that a quick press is camera_mode, a longer press is stop recording (useful for when I have it hooked up in the house to view files instead of running pkill every time I log in), and a long press is shutdown. Ultimately the first press can be used as a “protect” marker on files should it be required, but I’m getting ahead of myself!
# The following Python code has been copied from https://github.com/raspitv/bikedashcam/blob/master/dashcamcorder.py - Alex Eames and Raspi.tv try: while True: # this will run until button on GPIO13 is pressed, then # if pressed short, stop recording # if pressed long, close program # if pressed very long, shutdown Pi gracefully print "Waiting for button press" GPIO.wait_for_edge(13, GPIO.FALLING) print "Stop button pressed" stop_recording() # poll GPIO 13 bottom button at 20 Hz for 3 seconds # if still pressed at the end of that time period, shut down # if released at all, break for i in range(60): if GPIO.input(13): break sleep(0.05) if 25 <= i < 58: # if released between 1.25 & 3s close prog print "Closing program" GPIO.cleanup() sys.exit() if not GPIO.input(13): if i >= 59: shutdown() -
An Update…
So, after being alerted by the Raspberry Pi Weekly mailing list to a liveblog by Alex Eames detailing his process for building a biking “dash cam” I thought I better start detailing what I’ve done, what I’m currently doing, and what I plan to do with my PiDashCam project which has taken a back seat for a number of months years. I’ve watched the videos Alex has made, but not yet looked at the code. My first post was using an Original Raspberry Pi with no camera attached, hooked up to a GPS module to ensure I got valid GPS data, and a small SPI screen so I could view the data

The Before Unfortunately work and life took over and apart from spending a few odd minutes here and there over a number of months, no real advances were made apart from this update in which I was now testing with the Raspberry Pi Zero W, and figuring out how to get it talking to the GPS module, with the accelerometer, button and RGB LED all hooked up (but still no camera).

The After I’m now going to try and update here with that I’ve decided upon, some new design goals and design directions, and the code needed to run my PiDashCam, in addition to stripping back to the bare essentials (you know, like being a camera).
I’ve remained with the Raspberry Pi Zero Wireless and I have an RTC Module hooked up, in addition to the camera, and one button. At present, the Pi boots, and automatically runs two scripts.

The new, updated, lesser qualified PiDashCam The first, record.py, grabs the date and time, starts the camera, and starts recording, updating the annotated text on the screen. It then outputs a new file named after the current year, month, day, hour, minute and second (YYMMDDHHMMSS) every pre-determined number of seconds (roughly). You will be able to view this source code on GitHub as soon as I get round to uploading it. It also annotates the current date and time, and the current camera_mode.
The second, start.py, simply waits for the button press. At present it only detects an on push, nothing fancy like a multiple second hold. It then gracefully pkills the Python Process that is controlling the camera and after a few seconds delay, initiates a shut down of the Pi.
As its a bit unwieldily at present, I’ve stuck and blu-tacked it to a cheap dash camera I bought from eBay or AliExpress at some point or another.

The camera works when testing in my house. I’ve still to take it a road test and make sure it works. I have a second, cheap Dash Cam that was another eBay or AliExpress special that does what it needs to do, but the quality is pretty poor. I plan on keeping both cameras connected and comparing the output. If I cant at least match the quality of a sub £20 Dash Cam then there’s no real point in continuing this one.
My Plan is as follows
- Test the camera, make sure it works in the car
- QUALITY CHECK
- Test multiple camera modes with the First Edition Raspberry Pi Camera
- Test multiple camera modes with the Second Edition Raspberry Pi Camera
- Test multiple camera modes with a cheap FishEye Pi Camera
- QUALITY CHECK
- Add in GPS Logging
- Add second button for marking of emergency record
- Add in G-Sensor for additional annotation and Emergency Record Function
- QUALITY CHECK
- Create a settings style file where all user-selectable settings are set
- Put it all in a nice case
- Work out a way to convert the raw h264 files to a usable mp4 format
- Build a nice web-based interface with an API so that apps can access the files/settings via Wi-fi
- Integrate with the CAN-Bus to take car data for better analysis of driving etc.
After each quality check, if the quality is not something that is useful then it could be a cancellation of the project. I’m trying to provide a more organised, and focused attempt this time and having these Design Goals will ensure that I focus on what’s required without jumping ahead. As always, I’m a great started and terrible finisher, but hopefully that will change!
In addition to the PiDashCam, I’m Aldo going to try my had again at small electronics. I’ve had a plate of 100 of these WS8211B RGB LED’s, and due to the way I stored them, they managed to snap. Playing about with the layout meant I could resonable build a Binary Clock, which I’ve wanted to do for quite a while. Given how many I had though, I figured I could extend this out and make it alternate between a Binary and Regular clock, and seeing as I have an ESP8266 spare, this could all be controlled wirelessly, with the time updated from an NTP server. But, there will be a separate blog post about that!
Updated 20/02/2019 with correct links to Alex Eames blog and minor technical details.
-
Pi Zero W – PiDashCam Part 2
There will be a longer post about the newly released Pi Zero W, however suffice to say as soon as I saw it was available it was ordered, and I now have one!
There has been a few changes to the PiDashCam project, which has included moving to the Pi Zero when v1.3 was released (As it had a camera connector on the board). I missed my opportunity to write about those updates!
The Pi Zero W uses a similar set up to the Pi 3, in that the built-in bluetooth capabilities use the hardware UART, which means that my UART GPS receiver wont work.
As it is so similar to the Pi 3 (excluding the memory and processor) the current Device Tree for disabling bluetooth on the Pi 3 works for the Pi Zero W.
I’ve included some code below. This starts from a fresh install and allows you to use the hardware UART of the Pi Zero W and disables bluetooth on that board.
I hope it helps someone! (Also, feel free to replace vi with nano – I’m trying to teach myself Vim).
sudo vi /boot/cmdline.txt
in this file, remove the following text:
console=serial0,115200
Save and close the file. Next up,
sudo vi /boot/config.txt
and add the following to the end of the file:
enable_uart=1
dtoverlay=pi3-disable-bt
Next, it’s these three quick commands which includes a reboot of the Pi Zero W, which enables hardware UART:
sudo systemctl stop [email protected]
sudo systemctl disable [email protected]
sudo reboot
To complete the GPS side of things however, continue with the following:
sudo apt-get install gpsd gpsd-clients python-gps
sudo systemctl stop gpsd.socket
sudo systemctl disable gpsd.socket
and finally,
sudo killall gpsd
sudo gpsd /dev/ttyAMA0 -F /var/run/gpsd.sock
cgps
which should see you getting data from the GPS Receiver.
Thanks to Adafruit for their existing tutorial, and the Raspberry Pi github/forums and IRC for the Device Tree information.
-
2 years…
Wow. 2 years since my last post. This wont be a long post, or interesting, however I am surprised it’s been exactly 2 years since I last wrote on here.
Funny thing is, I’ve spent the last few hours looking at alternatives for WordPress. No idea why – I think I just fancied a change. Looks like I better write more before I worry about what backend the site uses!
There will be updates. I don’t know when, or have a plan for them, but they will involve my YouTube channel, my PiDashCam project (which is coming along… slowly), my 3D Printer(and the amount of issues it comes with) and other boring stuff that most people will probably not find at all interesting.
Until then!
-
The Raspberry Pi Dash Cam Project – Post 1
I’ve been toying with the idea of building a dash cam using a Raspberry Pi for a while. Every now and then I’ll buy something I think I’ll need for the project, hoping that I would get some time to work on it.
I’ve had a few days holiday, and one of my aims was to at least build a prototype in the days I had off.
I haven’t built a prototype, but I have the majority of parts together and verified that they worked! And it was surprisingly easy, apart from a 1.8″ Display (more on that later!).
Firstly, why not just buy one? Because I think I can build this, and I think I can enhance it and add to it, especially if I splash out and buy a Raspberry Pi 2! Also, why not?
My plan is to have the Raspberry Pi Camera Module recording as soon as the Pi boots to an acceptable state. A GPS receiver should then log the current GPS Position, heading and speed to a text file, and hopefully output some of that to a display. Likewise, an accelerometer and gyroscope should hopefully offer some additional readings to show the standard of driving.I plan to power the Pi via the cars 12v source (the accessory port or cigarette lighter). I will also have to create a safe power circuit so that once the vehicle has been switched off, the Pi shutdown gracefully. I will also have to make sure that when the vehicle starts there won’t be any sharp spikes in electricity which could fry the Pi.
So far I have:
The Raspberry Pi (Model B – Model B Rev 2 if required)
Raspberry Pi Camera Module
A DS3231 RTC (i2c)
A GPS Receiver (UART)
1.8″ Display (SPI).I have backed a BerryIMU, which has an accelerometer, gyroscope and magnetometer, which will connect over i2c, but that has still to be delivered.
To mount the camera to the window, I purchased some suction pads (the ones with nuts) and I’ll create a custom camera mount to use them with.
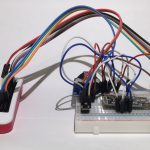
Yesterday and today I spent some time with the equipment I have to make sure it all works together, which, excluding the camera, it does! I’ve excluded the camera during this round of testing I want to get everything else working first. Heres the equipment, breadboard style. Please excuse the dust! The Pi was stuck behind my TV.

1.8 SPI 128X160 
CE INTEFORM 
5V J1 OPEN 
GPS via UART 


Heres a quick video of the Pi being powered up in my car, using the equipment I already had to hand. Sorry about the black box, but this GPS Receiver is pretty accurate!
Just now I’m running stock Raspbian, but I have also been playing with buildroot, specifically gamaral’s pre-built image.
https://www.youtube.com/watch?v=4Fjfqz6FxC8
It really does boot that quick. Once I have everything set up in Raspbian, i’m hoping a few more days of compiling will get me a full featured Dash Cam that boots that quickly using buildroot. I’m hoping that the recording will start within 5 seconds of power being applied.
All my goals for the system as pretty much listed above. I just have to start learning Python! Good think I backed another Kickstarter project!
With regards to the 1.8″ Display, that was a bit harder to set up.
I was under the impression the Display I had used a ST7735 driver, as everywhere online said thats what the display used. It doesn’t. It actually uses a HX8353 driver.
There is some commands below. Each command is on a separate line and should be executed separately.
I had to install a custom version of the Raspberry Pi’s firmware, developed by notro using this command:
sudo REPO_URI=https://github.com/notro/rpi-firmware rpi-update
and then
sudo reboot
This custom firmware contains all the drivers needed to use the screen on the Pi. I could compile the software myself, but this is a proof-of-concept to make sure everything works. I then shut down the Pi, and hooked up the display as per this wiring diagram (please excuse the rubbish 5 minute job):

One thing to note is that I hooked the Backlight directly to 5v, so the backlight is always on when power is applied to the screen.
I then fired the Pi up, and typed the following commands:
sudo modprobe fbtft dma
sudo modprobe fbtft_device custom name=fb_hx8353d gpios=reset:25,dc:24 speed=16000000 rotate=270 bgr=1
con2fbmap 1 1
This gave me the console on the screen. I then modified /etc/modules (using sudo nano /etc/modules), and inserted the following lines at the end
fbtft dma
fbtft_device custom name=fb_hx8353d  gpios=reset:25,dc:24 speed=16000000 rotate=270 bgr=1
It’s as easy as that!
Now, to learn Python!
-
Installing an SSD
So I decided to purchase an SSD for my Mac mini using some of the Amazon Vouchers I received for Christmas. After much research, I decided on the Samsung 840 EVO 250GB SSD from Amazon UK, which, at the time came in at £85.80. I bought a small fitting kit from eBay for £10.
I’ve uploaded a video to youtube. It is a highly sped-up version of me installing a Samsung 840 EVO 250GB SSD. I run a pretty standard 2.3 GHz Intel Core i7 Mac mini, with 16Gb RAM that I installed as soon as I purchased the machine.
You need an additional kit to fit the hard drive, which I purchased from eBay for £10. Beware however. The kit I purchased came with everything I needed, but the rubber grommets were too stiff and thick! I had to cut one grommet in half which fixed the issue.
All in, it took me about an hour to do taking my time and verifying everything I was doing with the iFixit site.
Before starting, my primary and pre-installed (1Tb) hard drive was showing as the bottom hard drive caddy in System Information.
On opening the mini, the Hard Drive was sitting at the top of the caddy, which, when the mini is sitting the right way up, would make it the bottom drive. The original SATA cable was plugged into the left port as you look at the mini being disassembled, which is the one nearest the bluetooth and Wifi antenna connector.
Eventually I put the 1Tb Hard Drive into the upper bay, transferring the black sheath around the original Hard Drive to the new SSD, and used the new SATA cable for the existing Hard Drive. I then put the new SSD in the bottom part of the caddy and used the existing SATA cable.
I swapped the cables as I read a few stories about read/write errors using third party SATA cables in the mini that only affected SSD drives. Better being safe than sorry!
I have a full video of my installation, including the issue with the grommets.
Before starting, I took a quick video to see how long it took to boot. My start was switching the mini on. The Stop mark was when the TomTom update helper popped up letting me know I had updates flashed onto the screen. I was a few milliseconds slow in stopping the video after the SSD install, but even with the time given, its still an astonishing difference.
Mac mini with no SSD boot time: 3 minutes, 15 Seconds.
Mac mini with SSD boot time: 56 Seconds.
I reckon thats near to a 72% speed increase in the boot time alone.
Generally I keep the mini running 24/7, so boot up times are not all that important, but the difference in software starting is astounding. iPhoto loads lightning fast, as does pixelmator. iMovie also. Other apps don’t even blink!
I’ll give it a few months and measure the performance again to see if it can keep it up.
-
iOS and Mac App Store
Its been said many many many times that the App store is broken. Several of the podcasts I listen to have discussed it at length. The search is terrible. The ranking system is awful. For new apps, it must be extremely hard to gain any traction.
I’m not an App developer (as much as I wish I was), but from a user perspective both the iOS and the Mac App Store are pretty painful to use.
Don’t get me wrong, if the App has a unique name, its pretty easy to find. It’s even better if its on one of the front pages. Apart from that? Good Luck.
One of the issues I have with both versions of the Store is the lack of interoperability.
I was looking at the Desk App online, via the developers web site. It looked pretty neat, had what looked like a good feature set, but no price. To see the price, I had to check the Mac App Store.
At the time, I was on my iPhone, and not near a computer (I use a Mac mini, so its not overly portable). Safari on my iPhone detected it was an App Store link, and fired up the iOS store, where I got the ever so helpful “Desk […] is only available on OS X” with no price. There is a handy “Learn more about this App” link, however that just takes me back to the developers website, desk.pm.
This isn’t directed at the developer of the App, but at the App Store itself. It just put off a potential impulse sale until I was back at my Mac.
I completley forgot about the App until just now, when I was using my Mac. I was installing Xcode, and on the main page of the Mac App Store, there was a featured App called Notability, tagged as “App of the Year”. Reading the description, I saw that it was both on sale and that there is an iOS version of the App.
Now, the reason for this whole post. Even though these apps are from the same developer, and will most probably be used together, nowhere in the Mac App Store (or the iOS App Store) does it provide an easy link to view the App for the different platform, nor provide an option to purchase it immediately.
Likewise (and again, I’m not a developer) I’m guessing that App Bundles can’t be used for cross-platform purchases.
It seems like Apple is missing a trick here. And for the record – I still haven’t purchased desk.
-

Just a little bit more.
That’s what I’ve been like over the last few days. Every time I try to move away from my computer I think of something I can change, or a small bug that I can fix over at whatplanshouldiget.uk.
I mentioned that site in my last post. It was going to be a quick script. A quick play around with PHP to keep me fresh, however still help me decide what price plan to get the new iPhone on, and possibly help others. I think, today, barring any bugs being found, it’s finished – excluding extra price plans being entered from MNVO’s.
A total of 1259 lines of my own code spread over 5 files. That’s not a lot in the grand scheme of things. That’s not a lot point-blank. But for something that started out as a simple exercise turned into a little bit more. I’m proud of it. My next task, being as its possibly only valid for a few months until the UK Carriers start offering cut price plans, is to turn it from procedural code into object orientated code.
I’ve been using PHP since Version 4. Version 4 was really easy to get into. It wasn’t strict with coding styles (as long as you followed the syntax), and has garnered a reputation as helping to create the worst developers in the world. PHP 4 was almost exclusively procedural, as well as a whole host of other things I won’t even pretend to understand. PHP 5 came along and changed all that, and I didn’t really keep up with the times. I’m aware of some of the syntax, and the reasons, but I still don’t fully grasp the idea of OOP. This small site will be a great stepping stone!
